Module Manifest
The module manifest – dapplet.json – is a JSON that is placed in the root of the module and contains all the required information that is needed to deploy the module and add it to the dapplet registry. It is a necessary part of every module.
Here is an example of the module's manifest:
Manifest Structure#
Some fields refer to package.json. They have "$ref" children with the field link values.
"$ref" is a part of JSON Reference specification. More details:
- https://datatracker.ietf.org/doc/html/draft-pbryan-zyp-json-ref-03
- https://niem.github.io/json/reference/json-schema/references/
All these fields are obligatory. Set them in package.json:
- name – the name of the module. The name is the ID of your module so it must be unique.
- version – a version of the module. Refer to SemVer format: https://semver.org/
- description – a brief description of your module. It's displayed in the dapplets list inside the extension's overlay and in the Dapplets Store.
- main – sets the entry point for the dapp.
Other parameters are specified in dapplet.json:
type – indicates the type of module. There are three types:
FEATURE– a dapplet, the main part that interacts with the adapter and the Core APICONFIG– a site-specific adapter that allows dapplets to work with site specific contextsINTERFACE– a virtual adapter which provides an interface for dapplets so they are able to use several site-specific adapters
title – a module's name. It's displayed in the extension's dapplets list, in the Dapplets Store, on the NFT, etc.
icon – a link to the dapplet's icon. It's an optional parameter.
contextIds – a list of resources where the module is loaded and activated. You should list site domains or a name of the module (adapter, interface), where domains are already listed.
For example, you can specify certain domains in the adapter's manifest:
and specify this adapter in the dapplet's manifest:
So this dapplet will be loaded and activated with the same resources as the adapter.
There is an opportunity to specify the dynamic context. It means that this context can appear on the page at any time and the module will start working. It may be a tweet or another type of post:
The last way to specify ContextIDs is setting the contexts determined by content detectors. Currently they are specified in the Dapplets extension and only one is available – "video" context:
This means that the module works if there are <video> elements on the page. This is also dynamic context.
note
Video contextId is currently not working, but it is planned to return in the near future. Follow our news and updates.
config – a dapplet's config. It's an optional field that's used only in dapplets. The idea is to add some settings to the dapplet which can be changed in the extension. For more information look here.
overlays – a list of the overlays that use the dapplet. If your dapplet uses the overlay you have to add its name/ID and the development server here:
An
assets-manifest.jsonshould be available at the root of overlay's URL. Example:
Check out how to make a dapplet with an overlay here: Overlays
dependencies – adapters which are used in the module. Currently you can set dependencies only for FEATURE modules (dapplets). Set site-specific and virtual adapters which you want to interact with.
interfaces – a list of interfaces (virtual adapters) that the adapter implements. It is an optional parameter for site-specific adapters. If some dapplet use a virtual adapter from this list the site-specific adapter runs in supported contexts.
Manifest Update#
The changes in dapplet.json will not be considered in the dapplet registry when you will deploy new module versions.
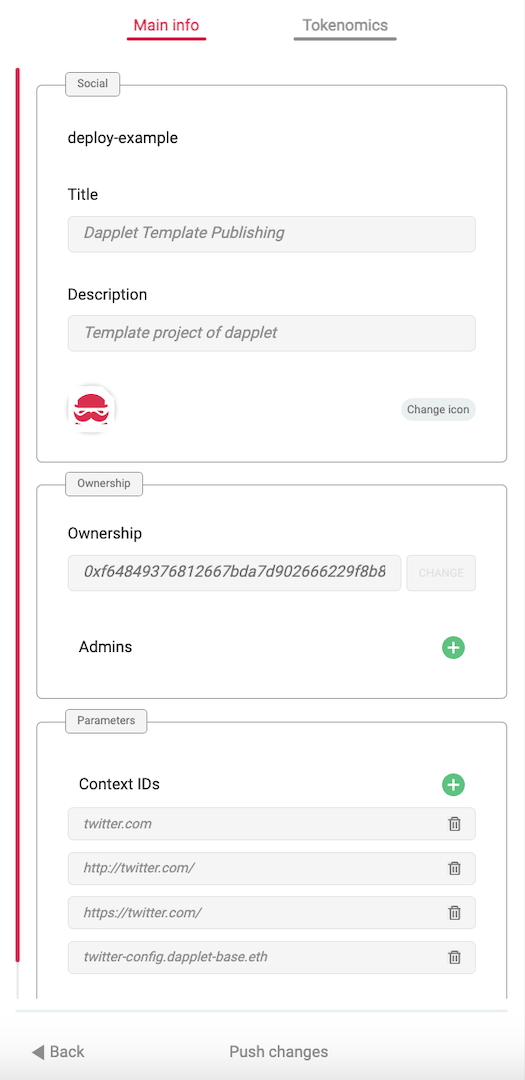
To change some information open the Dapplets extension, connect the wallet of the owner or admin of the module, and go to the Settengs -> Developer. You will see the Registry chapter with your published module. Open its settings.
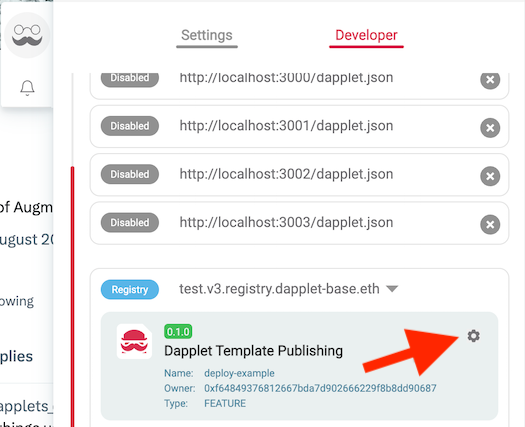
Here you can change: title, description, icon, ownership, admins, context IDs.